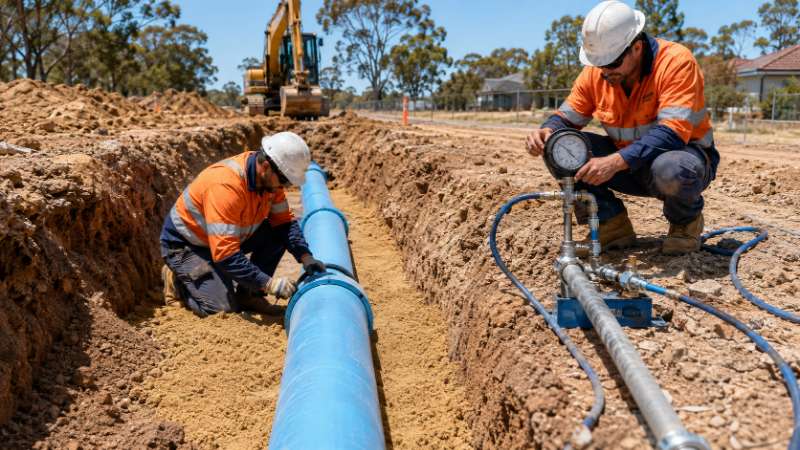
PVC pressure pipe installation follows four controlled stages: excavate and support the trench, place and compact the bedding and pipe zone, joint the pipe correctly for the system type, then backfill and hydrostatically pressure test the completed section before it is commissioned. In Australia, buried PVC pressure mains are installed to AS/NZS 2566.2 for flexible pipeline installation and AS/NZS 2032 for PVC pipe system practice, with minimum cover depth set by the relevant water authority — typically 600 mm in non-trafficable ground and 750 mm or more beneath roads.
Most PVC pressure pipe failures are not material failures. They are installation failures — inadequate side support, over-compacted or under-compacted haunch zones, dry rubber ring joints, or a thrust block that was never designed for the test pressure. Get the pipe zone right and a PVC main will outlast the crew that laid it.
Viadux supplies PVC pressure pipe and fittings to civil contractors, water authorities and irrigation projects across Australia, from branches in Sydney, Melbourne, Adelaide, Perth, Darwin, Gold Coast and Townsville. This guide covers the installation sequence our technical team is asked about most often.
Site preparation and trench design
Trench width governs how much side support the pipe will receive, and side support is what keeps a flexible pipe round under load. Excavating wider than necessary does not help — it increases the volume of embedment that has to be compacted, and increases cost.
Trench design and dimensions
Trench width at the pipe zone is generally the pipe outside diameter plus working clearance each side — commonly 150 mm either side for smaller diameters and up to 300 mm either side for larger mains.
Trench floor must be trimmed level and free of rock, hard spots and protruding stones. A single hard point under a PVC pipe creates a stress concentration that no amount of backfill will correct.
Where the trench base is rock or unyielding material, over-excavate and replace with compacted bedding material to the specified depth.
Bell holes must be excavated at each socket so the pipe barrel — not the socket — carries the load.
Temporary shoring and safety requirements
Any trench deeper than 1.5 m is classified as an excavation requiring specific controls under Australian WHS legislation, and entry into an unsupported trench is a recognised fatality risk. Shoring, shielding or battering must be designed before excavation begins, spoil must be set back from the trench edge, and safe access and egress provided. Refer to the Safe Work Australia Excavation Work Code of Practice and your jurisdiction's regulator for the controls that apply to your site.
Trench bedding and the pipe zone
The pipe zone is the embedment from the trench floor to a defined height above the pipe crown. It does the structural work.
Bedding material types
AS/NZS 2566.2 classifies embedment materials by their compactability and particle size. In practice, Australian crews work with:
Whichever class is specified, the material must be placed and worked into the haunch zone beneath the pipe springline. Voids under the haunch are the single most common cause of excessive deflection.
Compaction requirements
Compaction of the embedment is specified as a percentage of maximum dry density and is placed in layers — typically 150 mm compacted lifts — worked evenly on both sides of the pipe so the pipe is not displaced laterally. Compact the haunch by hand or with light equipment. Never run heavy plant directly over the pipe zone.
Jointing PVC pressure pipe in the trench
Two jointing methods dominate PVC pressure systems, and they are not interchangeable.
Rubber ring joints in confined space
Clean the socket, the ring groove and the spigot. Grit trapped under a rubber ring will cause a weep that only appears under test pressure.
Check the rubber ring is the correct type for the pipe and is seated evenly, with no twists.
Apply the manufacturer's approved lubricant to the spigot chamfer and the exposed face of the ring only. Never use petroleum-based lubricant on elastomeric seals.
Align the pipes straight before insertion — angular deflection during assembly is a leading cause of rolled rings.
Insert to the witness mark and no further. The gap left at the socket base is deliberate; it accommodates thermal movement.
Check the ring position with a feeler gauge around the full circumference where the specification requires it.
Solvent cement jointing precautions
Solvent cement welding is a chemical fusion process, not a glue. Use only primer and cement approved for the pipe class and diameter, work within the cement's open time, and hold the joint for the full set period before handling. Solvent cement joints must be given the manufacturer's specified cure time — which increases in cold or humid conditions — before any pressure is applied. Ventilate confined trenches and follow the safety data sheet. Viadux stocks approved solvent cement, primer and lubricant in the PVC ancillary range.
Thrust block design for bends and tees
Rubber ring joints do not resist longitudinal thrust. At every bend, tee, taper, valve and end cap, the unbalanced thrust force generated at test pressure must be transferred to undisturbed ground by a thrust block or a restrained jointing system. Thrust blocks are sized from the test pressure, the fitting geometry and the bearing capacity of the trench wall — not from a rule of thumb. Under-sized thrust restraint typically shows up as a joint pulling apart during the pressure test, which is the least expensive time to discover it.
Water pipe depth Australia — state regulations
Minimum cover for buried water pipe in Australia is set by the asset owner, not by a single national figure. The WSAA Water Supply Code of Australia (WSA 03) provides the baseline that most authorities adapt, and individual water authorities and councils publish their own technical specifications that override it.
General minimums
Non-trafficable areas (nature strips, easements, paddocks): commonly 600 mm minimum cover.
Trafficable areas and road crossings: commonly 750 mm or more, with additional protection or higher-class pipe often required.
Under road pavements, rail corridors and where trench loading is high: authority-specific requirements apply and are frequently deeper, with encasement or sleeving specified.
Reduced cover is sometimes permitted where concrete slab protection or a higher pressure class is used, but only with written approval.
Water pipe depth regulations Victoria
Victorian water corporations each publish reticulation and trunk main specifications that nominate minimum cover by location and pipe size. Melbourne metropolitan and regional corporations differ, so the governing document is the specification of the corporation whose asset you are connecting to.
Water pipe depth QLD — council requirements
In Queensland, cover requirements are set by the local council or distributor-retailer through their water supply design manuals, generally aligned to WSA 03 with local amendments. Requirements around Brisbane, the Gold Coast and Townsville are not identical.
NSW minimum cover
For work connecting to Sydney Water assets, the governing document is Sydney Water's technical specification for water reticulation, which nominates cover based on surface type, traffic loading and pipe class. Regional NSW councils apply their own equivalents.
WA and SA requirements
Water Corporation in Western Australia and SA Water each publish design and construction standards nominating minimum cover, embedment class and permitted materials for their networks.
The practical rule for any crew: confirm cover, embedment class and permitted pipe materials against the asset owner's current specification before you excavate — not after the pipe is in the ground.
Specifying PVC pressure pipe for a project? Talk to a Viadux technical representative at your nearest branch on 1300 VIADUX (842 389) for pipe class selection, jointing components and delivery scheduling. Find your closest Viadux branch.
Backfilling and compaction
Initial backfill lift over the pipe
Overlay material is placed and compacted in controlled lifts to a defined height above the pipe crown — commonly 300 mm — before any heavier backfill or plant is introduced. This layer protects the pipe from point loading during the remainder of the backfill operation.
Compaction equipment restrictions near the pipe
Do not operate heavy vibrating rollers or large plate compactors directly above the pipe until the specified overlay depth is achieved and compacted. Once sufficient cover is in place, normal trench backfill compaction can proceed to the surface reinstatement requirement.
Mark the alignment with detectable marker tape at the depth specified by the asset owner so the main can be located in future works.
Pressure testing PVC pressure pipe
Field hydrostatic test
Field pressure testing of buried PVC pressure pipelines in Australia is carried out in accordance with AS/NZS 2566.2 and the asset owner's specification. The general sequence:
Complete backfill over the pipe barrel, leaving joints exposed only where the specification requires visual inspection.
Confirm all thrust restraint is in place and any concrete thrust blocks have reached adequate strength.
Fill the section slowly from the lowest point, venting air progressively through air valves and high points. Trapped air is the most common cause of a failed test on an otherwise sound main.
Allow the pipeline to stand and stabilise so PVC creep and any temperature effects settle before test pressure is applied.
Raise to the specified test pressure, which is derived from the pipe pressure class and system operating pressure.
Hold and monitor for the specified duration, recording pressure and any make-up water added.
Test pressure, duration and acceptance criteria
Test pressure, hold duration and permissible make-up water volume are all nominated by the governing specification for the asset. Acceptance is normally based on the volume of water required to restore test pressure remaining below a calculated allowable figure, rather than on zero pressure drop — PVC is a flexible material and some pressure decay from viscoelastic expansion is expected and normal. Record the test on the authority's test sheet and retain it for handover.
Common installation mistakes to avoid
Skipping the haunch. Dumping backfill in and hoping it fills under the pipe leaves voids that produce excessive deflection months later.
Wrong lubricant. Petroleum-based products degrade elastomeric seals and cause delayed joint failure.
Inserting past the witness mark. Removes the thermal movement allowance and can roll the ring.
Testing before the concrete cures. Thrust blocks that have not reached strength will move under test pressure.
Assuming a national cover depth. Cover is asset-owner specific; assuming one figure across state borders creates non-conforming work and rectification cost.
Ignoring trapped air. Air pockets make a sound pipeline read as a failed test and send crews looking for leaks that do not exist.
PVC vs ductile iron for pressure mains
PVC pressure pipe suits most reticulation, irrigation and industrial pressure applications where diameter, pressure class and ground conditions fall within its range — it is lighter, faster to lay and corrosion resistant. Ductile iron pipe is generally selected for larger trunk mains, high pressure duties, and locations where mechanical strength or restrained jointing is the governing requirement. Many networks use both, with the selection made pipe run by pipe run. Viadux's technical team can work through the comparison for a specific project, and the Viadux Product Range Guide sets out the full pressure pipe range in one place.
For examples of PVC and ductile iron pressure mains delivered on Australian projects, see the Viadux industry case studies, including irrigation and trunk main installations across Victoria, NSW and Queensland.
Frequently asked questions
How deep should water pipe be buried in Australia? Minimum cover is set by the water authority or council that owns the asset. As a general guide, 600 mm applies in non-trafficable ground and 750 mm or more under trafficable surfaces, but the governing specification for your connection always takes precedence.
Can PVC pressure pipe be rubber ring jointed and solvent cement jointed on the same line? Yes, where the system design allows it, but the two joint types behave differently under thrust and thermal movement. The jointing method must match the fitting, the pipe class and the specification.
How long after solvent cement jointing can the line be pressure tested? Only after the manufacturer's full cure time for the diameter, cement type and ambient conditions has elapsed. Cure time extends in cold or humid weather.
What causes a PVC pressure main to fail its hydrostatic test? Most commonly trapped air, inadequate thrust restraint, a rolled or contaminated rubber ring, or an under-cured solvent cement joint — in roughly that order of frequency.
Talk to Viadux about your next PVC pressure pipe installation
Viadux has supplied Australia's water infrastructure for over 120 years, with PVC pressure pipe, fittings, valves and jointing components stocked across seven branches nationally. If you are specifying or laying PVC pressure pipe, our technical representatives can confirm pipe class, embedment requirements and jointing components against your project specification before you order.
Call 1300 VIADUX (842 389) or contact your nearest Viadux branch to discuss your project. For account customers, product availability and ordering are available through Discover maX.